Gopro Bird Feeder Camera – How to Set Up For Bird Photography

This page may have Commerce Content. If you buy something from our posts, we may get a small share of the sale. Click here for more.

Gopro-Bird-Feeder-Camera
Rob Johnston
Rob Johnston

Editor & Article Writer for Outdoor Wilds

Gopro Bird Feeder Camera - How to Set Up For Bird Photography

For those of you who own a GoPro and enjoy feeding the birds in your backyard or garden. This guide shares some of my experiences on how I go about photographing birds using a GoPro bird feeder camera.

I’ll run through various practices from how to mount the camera, camera settings, right through to image editing the final pictures to achieve the best results with your beautiful wild bird pictures.

Table of Contents - Fast Navigation

Mounting The Camera

I’m going to start off with arguably the most important part of the bird photography process and that is how to mount the camera close to a feeding area.

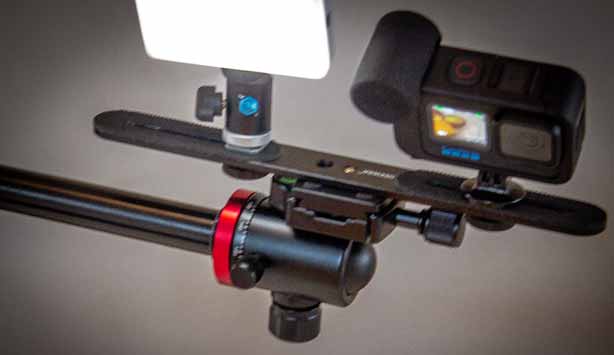
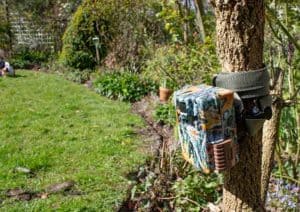
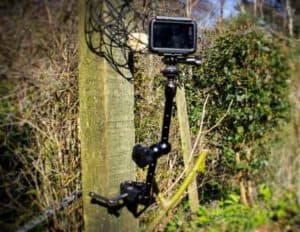
For positioning the camera to cover raised ground feeding areas such as a bird table or hanging mesh style food holders I use a magic arm mount.

Magic Arm Mount

The clamp at one end of the mount allows you to attach the arm to any object that fits inside the jaws of the clamp.

magic-arm-clampThis could be a tree branch, small post or even the feeder itself.

This versatility really does make it easy to set up the GoPro at the desired angle for the camera lens to be pointing where the action will take place.

gopro-magic-arm-mount

I’d suggest owning a magic arm not just for bird photography but just to have one in your action camera kit.

They really are very useful for a whole load of different types of filming usage.


Tripod Mount

If you don’t have a tripod then a low cost alternative is to use a metal or wooden stake with the magic arm we looked at earlier. It’s just a matter of clamping the arm to the stake at the desired height.

camera-tripod-set-at-ground-level

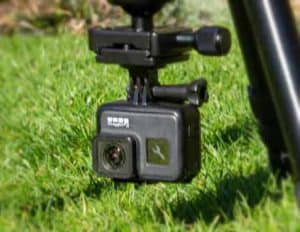
Where a tripod is useful is to cover birds feeding on the ground. With a mini tripod you can quickly set up the camera several feet away from the feeding area.

At the same time you have the versatility to quickly move the camera to a raised area of the ground to take pictures of birds feeding at a table for example.

Camera Position

Now you have an idea of how to mount the camera lets take a look at some best practices to ensure we get the best quality pictures.

I’d suggest setting the camera up when the weather’s going to be fairly clear and sunny. GoPro cameras like all cameras perform better in stronger lighting conditions. This can pose a problem in itself though.

tripod-camera-mount

Ensure the camera lens is facing away from the direct sun throughout the set up time. Sun can play havoc with the exposure of pictures if the lens is facing directly towards it.

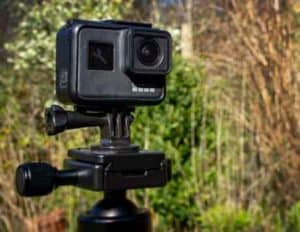
The other consideration is distance and that’s the distance from the feeding area to the lens itself.

For best results I place the camera around 12 to 18 inches from where the birds are most likely to be feeding.

Powering The Camera

The later model GoPro cameras can accept large micro SD cards up to 512 gb. A 128 gb card can record over 3 hours of footage at 4K video resolution. This duration would of course require several batteries at least.

To solve the power issue for longer record times the option of using a USB power bank plugged into the charge port will solve this problem.

The power bank doesn’t have to be huge. A 10,000 mAh bank will keep a GoPro recording for an extended period, enough to fill a 128 gb SD card.

Video & Picture Modes

The 2 camera modes I use for recording footage of birds is either video or burst mode. Burst mode being a series of still pictures in a sequence.

Mostly used to capture fast moving action, burst mode is ideal for taking pictures of birds landing on to a feeding station. 

In the settings menu you can set the number of still images to be taken once the shutter is opened. I tend to use the 1 to 5 option which means the GoPro will take 5 pictures over 1 second.

Video Mode

If your GoPro has 4k video resolution then I’d suggest shooting at the highest resolution. Once the footage has been recorded at 4k when video editing I scale the footage down to 1080p.

Scaling down from 4k to 1080p allows you to zoom into the video for a more close up action shot of the birds without losing picture quality.

In terms of frame rates at 4k I’d always go with the highest possible available on your GoPro camera up to 60 fps.

Control The Camera Remotely

In the last section I mentioned using burst mode and you’re probably wondering how I use that feature when the camera is set up close to a bird feeding station.

The answer is that I use the GoPro app. Connecting the camera to your iphone or tablet via the app allows you to see a real time preview of what the camera lens is capturing. It’s just a matter of hitting the record button on the app when you see some action taking place in realtime.

Remember there is a limitation to the range at which the GoPro wireless signal will operate. I’ve had a stable connection up to around 40 feet away which allows me to sit well away from the bird table in my house.

Camera Settings

The first setting that I select in the camera is Protune. Protune gives a more flat picture profile that provides more flexibility when editing the video or still pictures in Lightroom for example.

A more flat color profile recorded in the native file gives you the option of increasing the contrast ratio, saturation and so on, which you wouldn’t have if you record in GoPro color. Plus you can adjust these by small amounts in camera too when using Protune.

Exposure lock is my other key setting for static camera set ups. If there is a highlight in the frame, usually this is the sky then the camera will expose for the brightest part of the picture automatically.

By automatically exposing for the highlights this in turn underexposes the foreground which in most cases will be where the birds are feeding.

Lock the exposure on to the foreground to ensure that the birds plumage is not too dark or underexposed.

Final Thoughts

I hope you have found this article useful. It is by no means a definitive guide as every filming location and set up is different and presents its own problems. 

However I’m sure you’ll find at least some of these techniques useful when you’re starting off with recording birds in your backyard.

As an alternative to using a Gopro or any action camera for that matter, it’s worth looking at a trail camera for recording wildlife.

Trail cams have passive infrared sensors that detect motion which make them ideal for taking pictures of birds.

If you already have a trail camera then my bird feeder trail camera set up may be of interest.

Drop a comment down below if you have any further ideas or techniques on taking pictures of birds and wildlife using a Gopro, I’d love to hear from you.