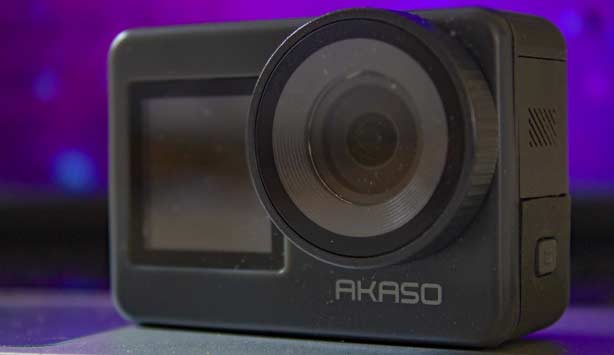
How To Set Up An Akaso Brave 7 Action Camera (Getting Started Guide)
This page may have Commerce Content. If you buy something from our posts, we may get a small share of the sale. Click here for more.
Rob Johnston
Editor & Article Writer for Outdoor Wilds
How To Set Up An Akaso Brave 7 Action Camera (Getting Started)
This guide is aimed at people new to action cameras and in particular the Akaso Brave 7. I’ll go through all the steps on how to set up the Akaso Brave 7 right from the moment you recieve the box ready to be opened.
If you take a look at the Table of Contents below it highlights the stages in this “Getting Started Guide”.
Congratulations on choosing your new Brave 7 action camera. To some this will be straight forward but I’ve included it in this guide for those who are completely new to the action camera experience.
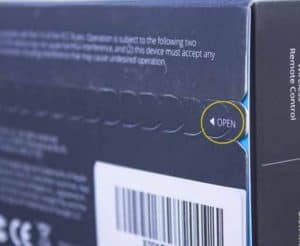
At the base of the box you’ll see a paper tab with the word “OPEN” printed. Carefully pull this tab to reveal a message from the manufacturer welcoming you.
Removing The Packaging
With the paper tab removed carefully pull the white cardboard box from the sleeve using the hole cut out to help you if the sleeve is on the tight side.
The camera is fixed to the top of the box via a mount so be careful at this stage.
Dismounting The Camera From The Box
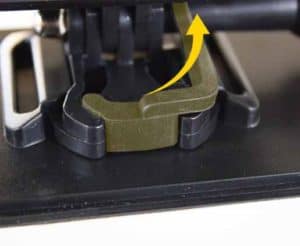
Remove the rubber grommet (Highlighted In Yellow)
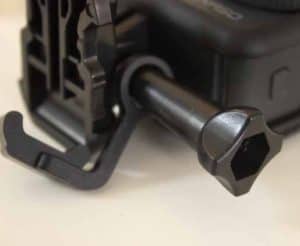
Unscrew the thumb screw (anti-clockwise)
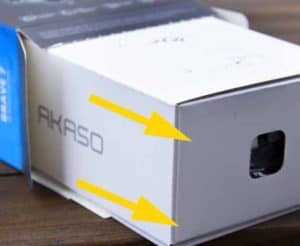
On the front of the white box you will see a diagram with 3 stages depicted.
The picture above is highlighting in yellow a rubber grommet securing the camera to the mount. Pull the grommet up and to the right from the mount and leave to the side.
Now squeeze the 2 prongs together slightly.
With the prongs squeezed together push the plastic buckle away from you to release the camera from the mounting base attached to the white card box.
Lay the camera down flat on a secure surface and turn the thumb screw anti-clockwise. Now you can pull the plastic buckle from the camera frame freely.
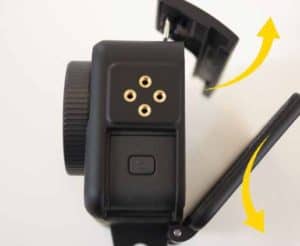
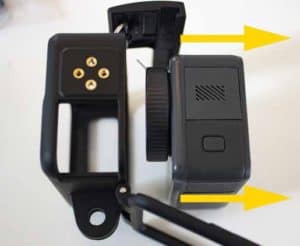
Camera Frame Removal
Unclipping the buckle at the top
Removing the camera from the frame
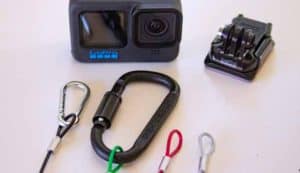
As you will see the Brave 7 is housed inside what’s called a camera frame during shipping to your postal address. This frame is important as it is used to mount the camera to all the various mounts that come supplied with the camera, 7 mounts in total.
To remove the mount, unclip the buckle at the top of the camera frame and open the rear door surround cover as shown in the picture above.
Carefully pull the camera from the frame. The frame is fairly tight so carefully using your thumbs add pressure to the front of the camera and push the camera out of the frame slowly.
I suggest now removing the 3 protective plastic films covering the lens, plus the front and back screen as the camera is safely removed from the camera frame for the first time.
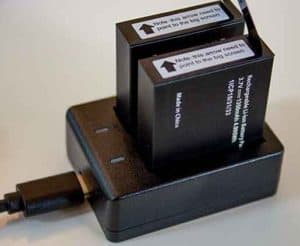
Charging The Batteries
Now it’s time to charge the 1350mAh batteries, 2 batteries come supplied with the Brave 7 camera. In the white box you will find.
1 x USB to USB-C charge cable
2 x batteries
1 x dual charger
Plug the USB to USB-C cable into the charger’s USB-C port on the side of the charger and the USB plug into any USB charging port. A smartphone USB charging plug you already own will do just fine.
Place the 2 batteries into the charger and leave for around 1 hour. The LED light will turn green when both batteries are fully charged.
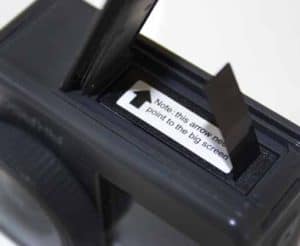
Inserting The Battery
At the base of the camera body is a large door which houses the battery compartment. To open the door press the catch down and slide forward. The door will open easily without any resistance.
Akaso have printed on the top of the battery the direction in which the battery should be placed inside the camera. (See Picture above).
Close the door covering the battery compartment and move onto the next stage.
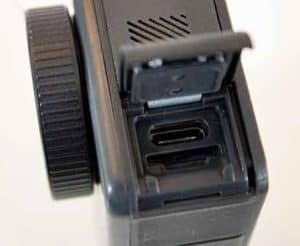
Inserting The Micro SD Card
The camera now has a fully charged battery installed. We’re going to need a micro SD card to store video and photos recorded by the camera.
A class 10 micro SD card is the minimum requirement to allow 4k video recording.
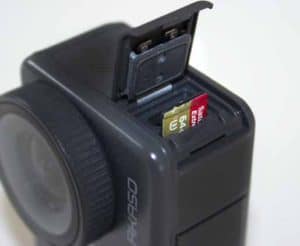
The micro SD card slot is housed under the small door on the bottom right of the camera (As shown in the picture above). Release the door as before to reveal both the card slot, plus a USB-C port.
The card slot is the larger of the 2. You must ensure the SD card is placed into the slot correctly. As you can see from the picture the printed side of the card must be facing away from the camera, i.e pointing down.
With the micro SD card placed in the card slot carefully press down until the card clicks into place. The card will now be almost flush with the top of the card slot.
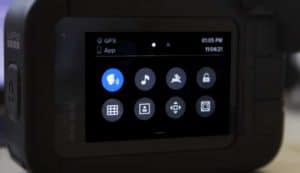
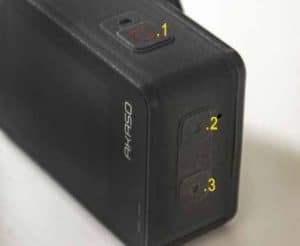
On Body Camera Buttons
3 menu options at base of screen
In the picture above I have numbered the 3 physical buttons you’ll find on the body of the camera housing.
Button number 1 is both the power button and the video record / photo shutter. The 2nd and 3rd buttons increase / decrease the 3 x zoom when the camera is powered to ON and is set to either video or photo mode.
The 3rd button also switches the front LCD color screen to ON by holding for 3 seconds. Repeat to switch back to the rear main LCD color screen.
Power the camera ON by pressing button No.1 (The red button at the top of the camera housing) and holding for a second. The camera will make a “wooshing sound” to anounce it has been switched ON.
A welcome message will appear the very first time you power the camera ON. Skip past the welcome message to proceed to the next stage.
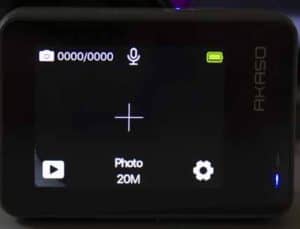
You are now presented with 3 menu options on the bottom of the touch screen. (See picture above).
Playback icon – displays all media stored on the SD card as thumbnails.
Video / Photo Modes – Centre.
Cog icon – In the bottom far right corner of the screen.
Tap the cog icon in the far right corner to access the settings menu.
Formatting The Micro SD Card
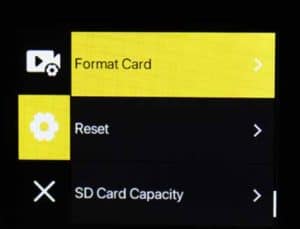
With the settings menu opened in the previous section of this guide you will now see further options.
To the right is another cog icon. Tap the cog icon and scroll down until you see “Format Card” highlighted in yellow. Tap the arrow on the far right of the highlighted Format Card option.
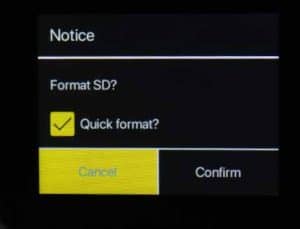
A message will now appear asking you to quick format the micro SD card. Tap confirm to format the SD card. NOTE: any data stored on the SD card will be erased by doing so.
Now tap using your finger the large X icon in the bottom left of the touch screen to exit the settings menu.
Video & Photo Modes
After you have formatted the SD card and exited the settings menu you will be returned to the original screen layout. A live preview from the camera lens, plus the 3 menu options we saw earlier.
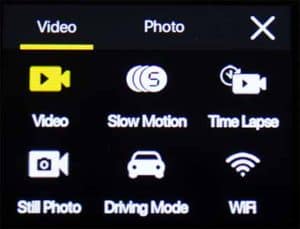
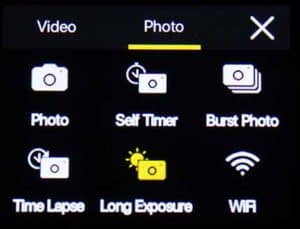
By tapping the current mode displayed at the bottom of the screen, i.e Video 1080P will lead you to the different modes under both video and photo that are available.
If you take a look at the 2 pictures directly above you’ll see all the modes available for both Video & Photo.
I’m not going to go into all the modes in this “Getting Started guide” as they are for the more advanced user later on.
Switching Modes
Let’s switch between Video & Photo modes by tapping the tabs at the top of the screen. You’ll see a yellow line highlighting which mode you are currently selecting.
With either Video or Photo selected, exit the modes menu by tapping the large X icon top right of the screen. I’d suggest starting in Video mode.
Video & Photo Menus
The final part of the guide is to show you how to set the resolution of both Video & Photos.
Having just selected Video mode in the previous section of this guide. Tap the cog icon at the bottom right of the screen we selected earlier to format the SD card.
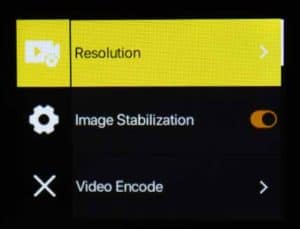
Setting The Resolution
You will now see “Resolution” in the options on the right of the screen. With Resolution highlighted in yellow tap the arrow on the far right of this option.
You will now have all the video resolutions and frame rates displayed in a list. Scroll down to view all of the list. I’d suggest starting with 1080P 60 fps. Now tap the X icon to return to the live camera preview display.
Photo Resolution
To change to Photo mode, tap the mode selected in the centre of the screen in the live preview display and switch to photo by tapping the photo tab at the top of the screen.
Exit the mode menu and tap the cog icon (Bottom right). You will see 20MP highlighted in the options list (see picture) tap the arrow to reveal all the photo resoultions available. I’d suggest 20MP to start off with.
You are now ready to video record or take photos which will be stored on the micro SD card. You can view all the video and photos by selecting the playback icon in the live preview display.
I hope that helps you getting started with the Akaso Brave 7 action camera [1]. Enjoy taking some great video footage and still photos to share with friends and family.